Blue CTF Writeup — TryHackMe.com

Introduction
In this writeup, I will go into detail on how I worked through completing the Blue CTF box found on tryhackme.com.
The Blue CTF focuses on gaining entry into the box via the exploitation of an SMB vulnerability, escalating your privilege using meterpreter, cracking LMNT hashes, and traversing directories to find 3 flags.
Please note that partway through the writeup the box’s IP address changes from 10.10.147.91 to 10.10.254.196 because I took screenshots for this writeup in 2 different sessions.
Reconnaissance
Once I had deployed the Blue box on its corresponding TryHackMe room, I checked the machine was up and running by pinging the IP address of the box.

When the ping confirmed that the box was up, I used Nmap to perform a TCP SYN port scan (-sS), a version scan on the services running on the box (-sS), and a vulnerability scan ( — script=vuln) on the box. I also used the output normal option (-oN) to save all the scans’ outputs into the file “blueNmapOutput”.

The vulnerability scan output was helpful because it found that the box was vulnerable to the MS17–010 SMB vulnerability. The MS17–010 allows attackers to perform remote code execution on a Windows machine that utilises a vulnerable version of SMBv1 that hasn’t applied the Windows security update 4013389 (Microsoft Security Bulletin MS17–010).

Gaining Access
On learning that the box was vulnerable to the MS17–010 vulnerability I searched for an exploit on Metasploit that would take advantage of the vulnerable implementation of SMBv1.

From the search within msfconsole, I chose to use the well-known ms_17_010_eternalblue exploit.

Next, I viewed the options of the exploit to see which of them should be modified.

On seeing that the remote host was required I set the remote host to the IP address of the Blue CTF box and then ran the exploit.


The EternalBlue exploit was successful, providing me with a shell on the Blue CTF machine.

Privilege Escalation
To escalate my privileges on the CTF box I needed to upgrade the shell session into a Meterpreter session. Meterpreter allows an attacker to interact with the machine like a shell while also providing the attacker with the ability to directly execute Metasploit attack payloads within the machine’s memory by utilising DLL injection.
DLL injection is a form of code injection used by malware to execute malicious code by forcing the legitimate process to load a malicious DLL into its process memory space. DLL injection works by allocating memory in the legitimate process and copying the path of the malicious DLL into the allocated memory within the legitimate process’ address space. Then a new thread is executed with a pointer to Windows’ LoadLibrary() function and to the allocated memory with the DLL’s pathname, allowing for malicious code to be executed.
To upgrade the shell to a Metepreter session I used Metasploit’s shell_to_meterpreter module which I found using msfconsole’s search command.

Once I had selected the shell_to_meterpreter module, I viewed the options to see which options required modification.

On seeing that I needed to modify the SESSION option to have the value of the shell session’s ID, I set the SESSION option to 1.


Once I had finished setting the options of the shell_to_meterpreter module, I ran it using the command ‘exploit’. The upgrade was successful, creating a meterpreter session on the CTF box with the ID of 2. I then made the Meterpreter session active by entering ‘sessions 2’ into the console.


To escalate my privileges to that of the NT AUTHORITY I needed to hijack a legitimate process running on the CTF box under the NT AUTHORITY\SYSTEM user. To list all the running processes on the CTF box I entered the ‘ps’ command into the Meterpreter shell.
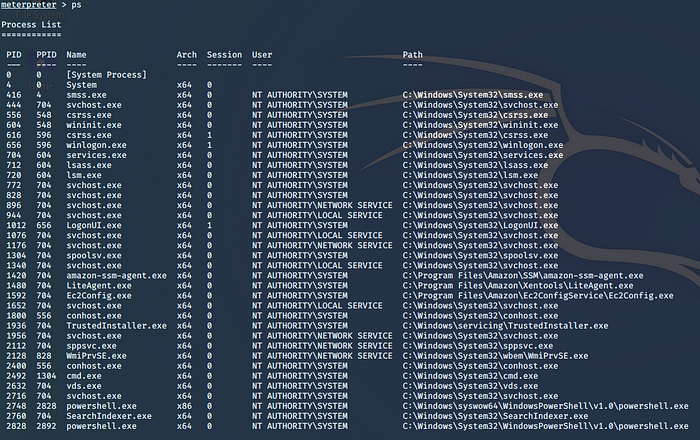
I decided to hijack the SearchIndexer.exe process because it was running as NT AUTHORITY\SYSTEM. This was achieved by using the ‘migrate’ command to migrate the Metepreter process on the box to the SearchIndexer.exe process using the PID of the SearchIndexer.exe process as a target.

Hijacking the SearchIndexer.exe process allowed me to execute code as the privileged NT AUTHORITY\SYSTEM user and to uncover the password hashes of the Windows user accounts using Meterpreter’s ‘hashdump’ command which dumps the contents of the Security Account Manager (SAM) database. The SAM database file stores the hashed users’ passwords on Windows operating systems up to and including Windows 10.

Cracking the Password Hashes
The dumped Windows users’ credentials are hashed using NTLM. The dumped credentials seen in the screenshot above can be split into 4 components: the user, the relative identifier (RID), the LM hash, and the NT hash. For example, the credentials for the user Jon can be split into the following components:
- Username: Jon
- Relative identifier: 1000
- LM Hash: aad3b435b51404eeaad3b435b51404ee
- NT hash: ffb43f0de35be4d9917ac0cc8ad57f8d
To recover the user passwords I copied the credentials to a hashes.txt file and removed everything apart from the NT hashes.

To crack the hashes I used Hashcat to perform a wordlist attack on the NT hashes. The wordlist I used for the attack was rockyou.txt. The rockyou.txt wordlist contains 14,341,564 unique passwords ordered in descending popularity. The plaintext passwords were originally obtained in a breach that occurred in 2009 where 32 million user accounts from RockYou (a company that developed widgets for MySpace and applications for Facebook) were stolen.
To tell Hashcat to perform a wordlist attack on the hashes text file using the rockyou.txt wordlist I used the following command:

The ‘-m 1000’ option notified hashcat that it is trying to crack NT hashes and the ‘-a 0’ option tells the hashcat application that it should perform a normal wordlist attack on hashes.txt file using the rockyou.txt wordlist.
Within seconds hashcat was able to crack the NT hash of the user Jon, revealing that Jon’s password is alqfna22.

Finding the Flags
To search for the flags I went back to the Meterpreter shell I had established on the CTF box and used the search command to search for the text files that had a filename that consisting of ‘flag’ followed by any character (represented by *) and ending with the ‘.txt’ file extension.
Performing this search found all three flags and notified me of each of the flags’ locations.

Now knowing the locations of each of the text file flags, I used the cat command to output the contents of each of the text files.


The Flags
Flag 1: access_the_machine
Flag 2: sam_database_elevated_access
Flag 3: admin_documents_can_be_valuable
Thank you for reading!